Understanding and Implementing PKI with OpenSSL
Contents
Contents
Introduction
This post will aim to give an overview of TLS and public key infrastructure (PKI). This first part of this post will give a theoretical overview of how it works. The second part of the post will demonstrate how to setup a CA with OpenSSL and create certificates for web servers and code singing purposes. Furthermore, the code signing certificate will be used to sign a binary on a Windows machine. For more detailed information about TLS and PKI I recommend the Bulletproof SSL and TLS book, there are some diagrams in this post that are actually from this book.
PKI in Theory
TLS
Transport Layer Security (TLS) is a cryptographic protocol that has the goal of securing a line of communication between two parties. There are a few components of TLS, two of the most important are the authentication and encryption components.
Usually when checking the cipher suite of a website using TLS you may see a string such as the following: Cipher Suite Construction (Bulletproof SSL and TLS Book)
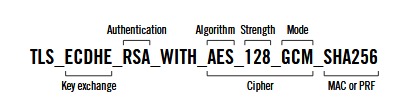
Cipher Suite Construction (Bulletproof SSL and TLS Book)
From this cipher suite we can figure out which cryptographic primitives are being used for what task. RSA is being used for authentication, there are some websites that use ECDSA for this task. The authentication mechanism relies on public key cryptography. During the beginning stages of the TLS handshake the client will send the server a message encrypted with the servers public key. The only way the server can read the message is by having in its possession the private key, this will prove to the user the identity of the server. If the server is unsuccessful at decrypting the message the TLS connection cannot move forward to the next phase.
The second important component is encryption, this is handled by the symmetric cipher AES with a key size of 128 bits using the GCM mode. Its important to understand that AES will take a preshared secret that both parties must be in possession of, this is where the key exchange phase comes into play. Diffie Hellmen (DHE), or in this case Elliptic-Curve Diffie Hellman (ECDHE), is used to create a shared secret between two parties communicating over an unsecure medium. Once this shared secret is created it can be fed into AES which will encrypt the data. After a set time the key exchange process will renegotiate a new shared secret.
Now, there is a very important concept called Perfect Forward Secrecy. What this allows us to achieve is the separation between the key used by the server for authentication and the key used for encryption. This extremely important as the key used for authentication is stored on the web servers disk, if it is compromised it is impossible to decrypt any intercepted TLS traffic as that is not the key used for encryption. The key used for encryption was generated using the DHE algorithm and is considered ephemeral, which means it only exists for a specific period of time during a TLS session.
In TLS 1.2 a user has the ability to pick the cipher suite, one of the options is to use the RSA key for authentication as the encryption key. This will not provide any Perfect Forward Secrecy, a shared secret will be generated and encrypted with the RSA key which will be used for encryption by both parties. This will allow an attacker in possession of the RSA private key to decrypt TLS traffic on the fly, this can be dangerous if in the hands of an attacker but at the same time useful if used by a company to inspect TLS traffic for signs of malicious intent. One interesting thing to note is that ECDHE is made mandatory in TLS 1.3, this means that it will not be possible to intercept TLS traffic using this method.
Certificates
People connect to websites every day using TLS, as stated in the previous section on important component is authentication. A user has to know if the website they are connecting to is legitimate or an imposter website. This is done by checking the websites certificate using the X.509 certificate provided by the website and the public key. Below can be seen an outline of the contents of a X.509 certificate:

X.509 Public Key Certificates (Microsoft Docs)
The X.509 certificate contains important information about the entity, such as a website or user. It may contain information such as the domain of a website, when the certificate expires, and who issued the certificate. This certificate also contains the public key of the entity, which is used during the TLS negotiation phase.
One interesting problem revolves around how a user can confirm that a certificate is a legitimate certificate associated with a specific entity. For example, how can you know that the certificate provided by your banks website is actually from the bank and not from a attacker siting in a coffee shop. This issue is solved by using certificate authorities, which are discussed in the next section. For this section the most important thing to understand is that entities, such as websites or users, can be represented using certificates.
Certificate Authority
A certificate authority (CA) is used as a central root of trust that users inherently trust. Now lets go back to the problem at hand, how can we know if a certificate is trust worthy? We can confirm the legitimacy of a certificate by checking if it is singed by a valid CA. Lets look at the example below of the certificate hierarchy for this website:
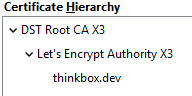
Certificate Hierarchy
We can see that there are three entities, DST Root CA, Let’s Encrypt Authority, and thinkbox.dev. Lets start from the bottom. When you initially connect to this website you will receive a certificate from the webserver, this is the certificate that identifies the thinkbox.dev entity. In order to confirm this is a legitimate certificate you check that it is singed by the Let’s Encrypt Authority intermediate CA. After a check will be performed on the Let’s Encrypt Authority intermediate CA certificate to confirm that it is singed by DST Root CA. If all these checks pass we know that thinkbox.dev is a legitimate certificate.
DST Root CA is the Root CA, it is self singed. This CA’s certificate is stored on a machine and is not transferred over the network. The root of trust lies with the Root CA. Lets Encrypt Authority is considered an intermediate CA as it is used to sign certificates for websites. The Root CA key is considered important and is stored offline most of the time.
Through this mechanism we now have a method of verifying the identity of an entity before establishing a secure connection. Just to clarify quickly take a look at the diagram below:
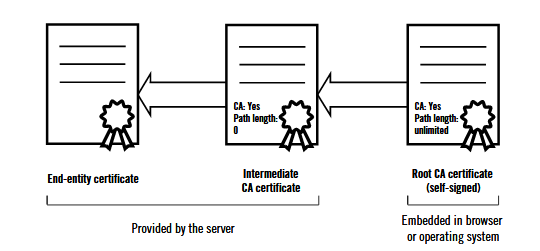
Certificate Chain Bulletproof SSL and TLS Book
The Root CA is stored on the system, either with the operating system or the browser. It is never transferred over the network. The intermediate CA and the end entity certificate are bundled together, for example the thinkbox.dev and Lets Encrypt Authority CA certificates are bundled into a single file referred to as the certificate chain. There is no real reason to hold the intermediate CA certificate on a system as its identity can also be verified through the Root CA. Furthermore, the validity time of the intermediate certificate is usually much less that the Root CA and will need to be changed more often over a long period of time.
Security Features
HSTS
HTTP Strict Transport Security (HSTS) is a mechanism that informs the browser it should interact with a website using TLS. You can think of this as caching which sites use TLS in a way, however, this is done for security reasons to prevent downgrade attacks and cookies being transferred over plaintext. This is a feature that needs to be configured on the web server serving a TLS connection in order to server the HSTS in the HTTP answer, the following shows an example of a Nginx HSTS configatiton setting:
|
|
As can be seen HSTS is enabled for all a domain and all of its subdomains for 31536000 seconds, which is around 1 year.
There also exists HSTS preloading where a browser already knows it should connect using TLS from a list. All .dev domains are included in this HSTS list, and there are methods of adding your own domain to this list. More information about be found in these two blog posts .
CSP
Content Security Policy is a mechanism that aims to dictate what content can load on a web page, for example it is possible to prevent inline Javascript from running and control which sources Javascript code can load from. Such a feature can mitigate the effects of a Cross Site Scripting attack. It is also possible to control where other forms of content load from, such as limiting images to a single domain. For more information please view this blog post .
Certificate Pinning
Certificate pinning aims to make a connection between a service and the certificate it provides. For example, when you load your browser and go to a website there will be a check made in order to confirm that the certificate really does belong to the service you are connecting to. Google used to do this with their websites on the Chrome browser, however, they seem to have backed away from this feature. Certificate pinning is not widely adopted by browsers and is not commonly used.
Revocation
Revoking certificates is useful in a few scenarios, one of which is if the private key of your certificate is leaked. There are two revocation methods that can be used depending on the application.
CRL
A Certificate Revocation List (CRL) is generated from a list that holds all the certificates that have been revoked. Modern browsers do not support CRL files, however, there are applications such as OpenVPN which do support it. If a user of a OpenVPN server lost their private key the administrator can revoke the certificate so an attacker cannot connect to it.
OCSP
Online Certificate Status Protocol (OCSP) is a protocol that works over HTTP which can tell a client if a specific certificate is revoked or not. A client connects to a server called the OCSP responded, it sends a query for a specfic certificate and receives a reply. This is the method that modern browsers use.
PKI in Practice
Overview
This section will aim to create a set of CA’s and certificates for some services using OpenSSL. The following diagram shows the PKI layout overview:
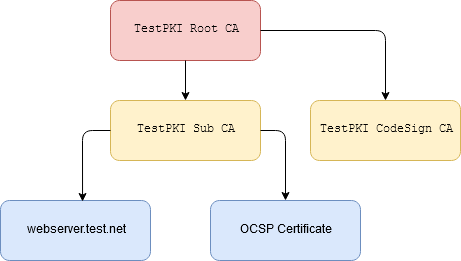
PKI Diagram
We will be generating a RootCA first. Next we will create two intermediate CA’s for web services and code singing. Lastly, we will create a certificate for two web services and sign them with the Sub CA.
The first web service will be a simple static web page. The second will be a OCSP responder, this needs a certificate because it works over HTTP in plain text and needs to be singed to prevent tampering.
Lets begin by setting up a directory structure as seen below in the code snippet. We are going to have 5 folders for all the entities we want to represent.
|
|
You must also make sure that you have the configuration files for OpenSSL on the system and in the proper location, if not the commands that follow in the next section will not work.
Scroll down to the appendix in order to view the configuration files and place then into the correct location as seen in the code snippet below.
|
|
Create Root CA
In this section we will generate the Root CA key pair and create a certificate. The following shows the directory structure you should have setup.
|
|
Begin by creating three files, root-ca.db, root-ca.db.attr, and root-ca-crt-srl. The following list shows a short description of each file created.
- root-ca.db: This text database will hold a list of issued certificates and there state of validity, that is whether they where revoked or not.
- root-ca.db.attr: A file with attribute set, for example it can allow a CA to issue multiple certificates with the same subject field.
- root-ca-crt.srl: This contains the serial number that will be used by the CA, this is supposed to be a unique number among all CA’s. There are standards that dictate this value should have 64 bits of entropy .
|
|
Now the Root CA certificate can be created. The first command below will create a Certificate Signing Request (CSR), which is a file that contains a certificate which needs to be signed by a CA. Since the Root CA is a self signed CA the second command will create a self singed certificate from the CSR.
|
|
Create Intermediate CA
In this section we will generate the Intermediate CA key pair for Sub CA and create a certificate. The following shows the directory structure you should have setup.
|
|
Just like with the Root CA the initial setup files must be created, for a description of each reference the previous section.
|
|
Once again we begin by creating a CSR for the Sub CA in the first command. This time we head over to the RootCA directory and use the Root CA certificate and key in order to sign the CSR. Lastly, we create a certificate chain which will contain the RootCA and the SubCA, this will be used as input for our OCSP responder in a later section.
|
|
Create Code Signing CA
In this section we will generate the code signing CA. The following shows the directory structure you should have setup.
|
|
Just as before we begin by generating a CSR. We go to the RootCA directory in order to sign the Code Signing CA CSR with the RootCA key. Once this is finished we package the Code Signing certificate and private key in a PKCS12 format file. We do this in order to reference a single file on a Windows machine we will use to sign application in a later section.
|
|
Web Server Certificate
Since we will have a website with TLS we will create a certificate for it. The following shows a directory structure that should match yours.
|
|
We begin by generating the key and CSR for the certificate in the first command. After, we go to SubCA in order to sign the CSR of the web server. Lastly, we create a certificate chain file which will contain the web server certificate and the Sub CA certificate.
|
|
Create OCSP Certificate
Lastly, since OCSP works over HTTP we need to sign the message with ac certificate. Within the OCSP directory create a new CSR for the OCSP certificate. Next, go into the SubCA and sign the CSR.
|
|
PKI in Action
This section will aim to demonstrate the PKI in action by showing it working within the browser on a website, and signing Windows applications with the Code Signing CA.
Using Website Certificate
A web server was configured along with DNS for the webserver.test.net domain. On a Windows machine the Root CA was imported into the root CA store. As can be seen below Firefox tells us we have a secure connection to the web server.
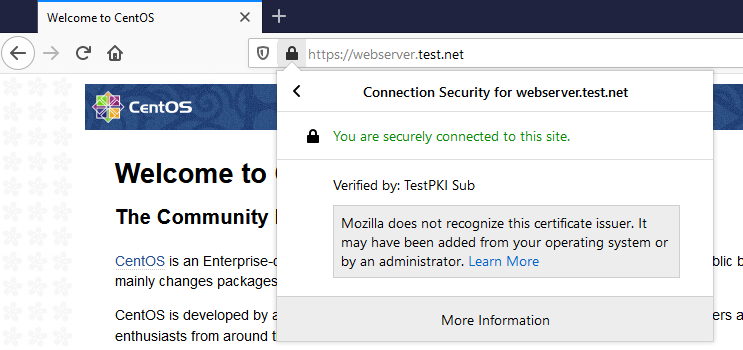
Website Secured with TLS
Upon further inspection we can see a familiar certificates hierarchy. We have the Root CA on the system and received the Sub CA and web server certificate from the web server. The certificates all validates and Firefox tells us we have a secure connection.
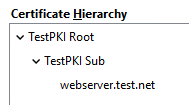
Certificate Hierarchy
Revoking Website Certificate
Since we connected succesfully to the web server we will now revboke the certificate. Below is the command used to revoke the certificate.
|
|
The following command will run a OCSP responder for clients to query.
|
|
Now before connecting one thing should be pointed out. OCSP is by default set to soft fail, this means even if the certificate is invalid the connection will be allowed. A hard fail can cause issues if the OCSP responder cannot be reached, for example if the CA’s infrastructure goes down. In order to set it to hard fail in Firefox set the security.OCSP.require option to true in the about:config settings.
After this is done browsing to the website greets us with an error preventing us from getting access.
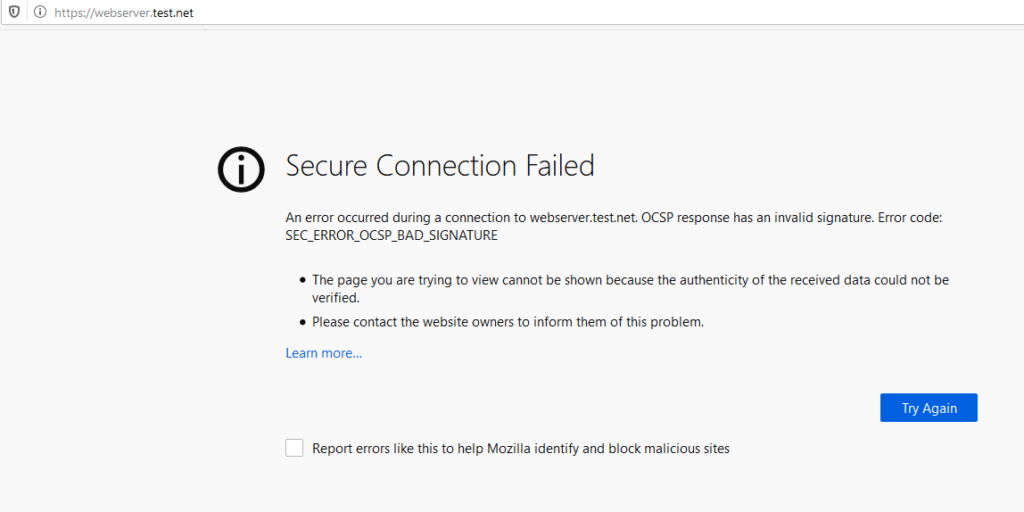
OCSP Browser Error
Looking in Wireshark we can see a request was sent, in the reply within the red rectangle we can see that the OCSP responder notifes us that the certificate is revoked.
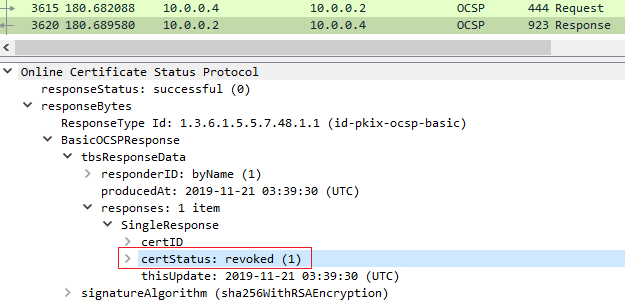
OCSP Wireshark Traffic
Signing an Windows Applications
In order to sign Windows applications a Windows machine is needed, I used Windows Server 2019 for this task. In order to sign applications the signtool program is needed, this can be downloaded thought he Windows SDK kit. As seen below you only need to select the “Windows SDK Signing Tools for Desktop Apps”.

Installing Windows SDK Signing Tools
Transfer the Code Sign CA PKCS12 format file created onto the Windows machine. Below is a command shown which will sign a executable file. We need to specfy the PKCS12, the password, and a timestamp server. The timestamp server is used to allow ‘signatures to be verifiable even after the certificates used for signature have expired‘ .
|
|
Below can be seen a PowerShell Cmdlet is being used to sign a PowerShell script. The same idea applies as to the binary executable file.
|
|
Now we can see that the executable file has a signature.
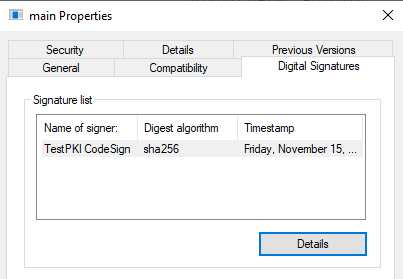
Signed Binary
The PowerShell script also has a signature.
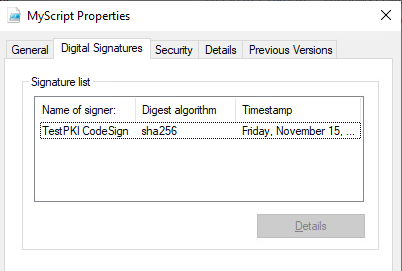
Signed PowerShell Script
Looking at the certificate path we can see these files have been signed with the Code Sign CA, which has been verified by the Root CA.

Certificate Path
References
- Manage PKI Using OpenSSL
- OpenSSL Certificate Authority
- Creating an OSCP responder in Docker
- Designing and Implementing a PKI: Part I Design and Planning
- Bulletproof SSL and TLS: Understanding and Deploying SSL/TLS and PKI to Secure Servers and Web Applications
- Signing Windows Programs with SignTool
- Windows Authenticode Portable Executable Signature Format
- HSTS – The missing link in Transport Layer Security
- HSTS Preloading
- Content Security Policy – An Introduction
Appendix
root-ca.conf
|
|
subca-ca.conf
|
|
codesign-ca.conf
|
|
webcert.conf
|
|